智慧交通解决方案
智慧交通解决方案旨在检测和跟踪车辆和行人,并提供估计十字路口安全指标所需的情报。此外,在支持 5G RAN 的平台上实施时,参考实现中包含的英特尔® Smart Edge Open 工具包可用于在同一
概述
智慧交通解决方案旨在检测和跟踪车辆和行人,并提供估计十字路口安全指标所需的情报。此外,在支持 5G RAN 的平台上实施时,参考实现中包含的英特尔® Smart Edge Open 工具包可用于在同一边缘设备上托管 5G 无线接入网络 (RAN)。
车辆、摩托车手、骑自行车者和行人通过目标检测深度学习模块被检测并定位在视频帧中。对象跟踪可识别在连续帧中检测到的同一对象,从而能够估计对象的轨迹和速度。参考实现可自动检测碰撞和未遂碰撞。实时仪表板将从交通交叉口提取的情报与带注释的视频流一起可视化。
这些收集到的情报可用于调整交通信号灯循环,以近乎实时地优化十字路口的交通流量,或评估和提高十字路口的安全性。例如,紧急服务通知(即 911 呼叫)可以通过碰撞检测触发,从而缩短紧急响应时间。碰撞次数较多且未命中碰撞检测的交叉路口可以被标记为高风险交叉路口,以引起当局的注意。
使用SmartEdge-Open高速数据平面,可以很容易地路由来自十字路通摄像头的数据,以便在现场进行近乎实时的视频分析。此外,SmartEdge-Open 还有助于构建和管理基础架构,以跨多个边缘设备部署、监控和编排虚拟化应用程序。
要运行参考实施,您需要首先下载并安装英特尔®智能边缘开放式开发人员体验套件。
安装英特尔®智能边缘开放式开发人员体验套件后,选择配置和下载以下载参考实施和下面列出的软件。
对于开源应用程序,请访问 GitHub WNR-ITM 存储库以获取源代码。
它是如何工作的
该应用程序使用推理引擎和英特尔®深度学习流处理器(英特尔® DL Streamer)。该解决方案旨在通过使用具有多节点支持的英特尔® Smart Edge Open(版本 22.03)来检测和跟踪车辆和行人。

图 1:工作原理
Wireless Network-Ready 应用程序需要应用程序 Pod、数据库和可视化工具。安装成功后,应用程序就可以使用 Helm* 进行部署了。部署后,应用程序 Pod 接收虚拟/真实 RTSP 流地址并执行推理,并将每个流的元数据发送到 InfluxDB* 数据库。可视化工具并行显示对元数据的分析,例如检测到的行人、观察到的碰撞和处理的视频源。
该应用程序能够在多达 20 个通道上执行推理。此外,可视化工具能够单独显示每个源,并使用 Grafana* 同时显示所有源。用户可以通过浏览器远程可视化输出,前提是它们位于同一网络中。
此版本中的新增功能是规则引擎和 Cloud Connector 容器。
-
规则引擎分析每个视频帧及其推理结果。如果与配置的规则(冲突、未遂事故、过度拥挤)匹配,则会将视频帧发送到云连接器以上传到云存储。
-
Cloud Connector 使用 Amazon Web Services* Cloud Storage 来保存视频捕获。
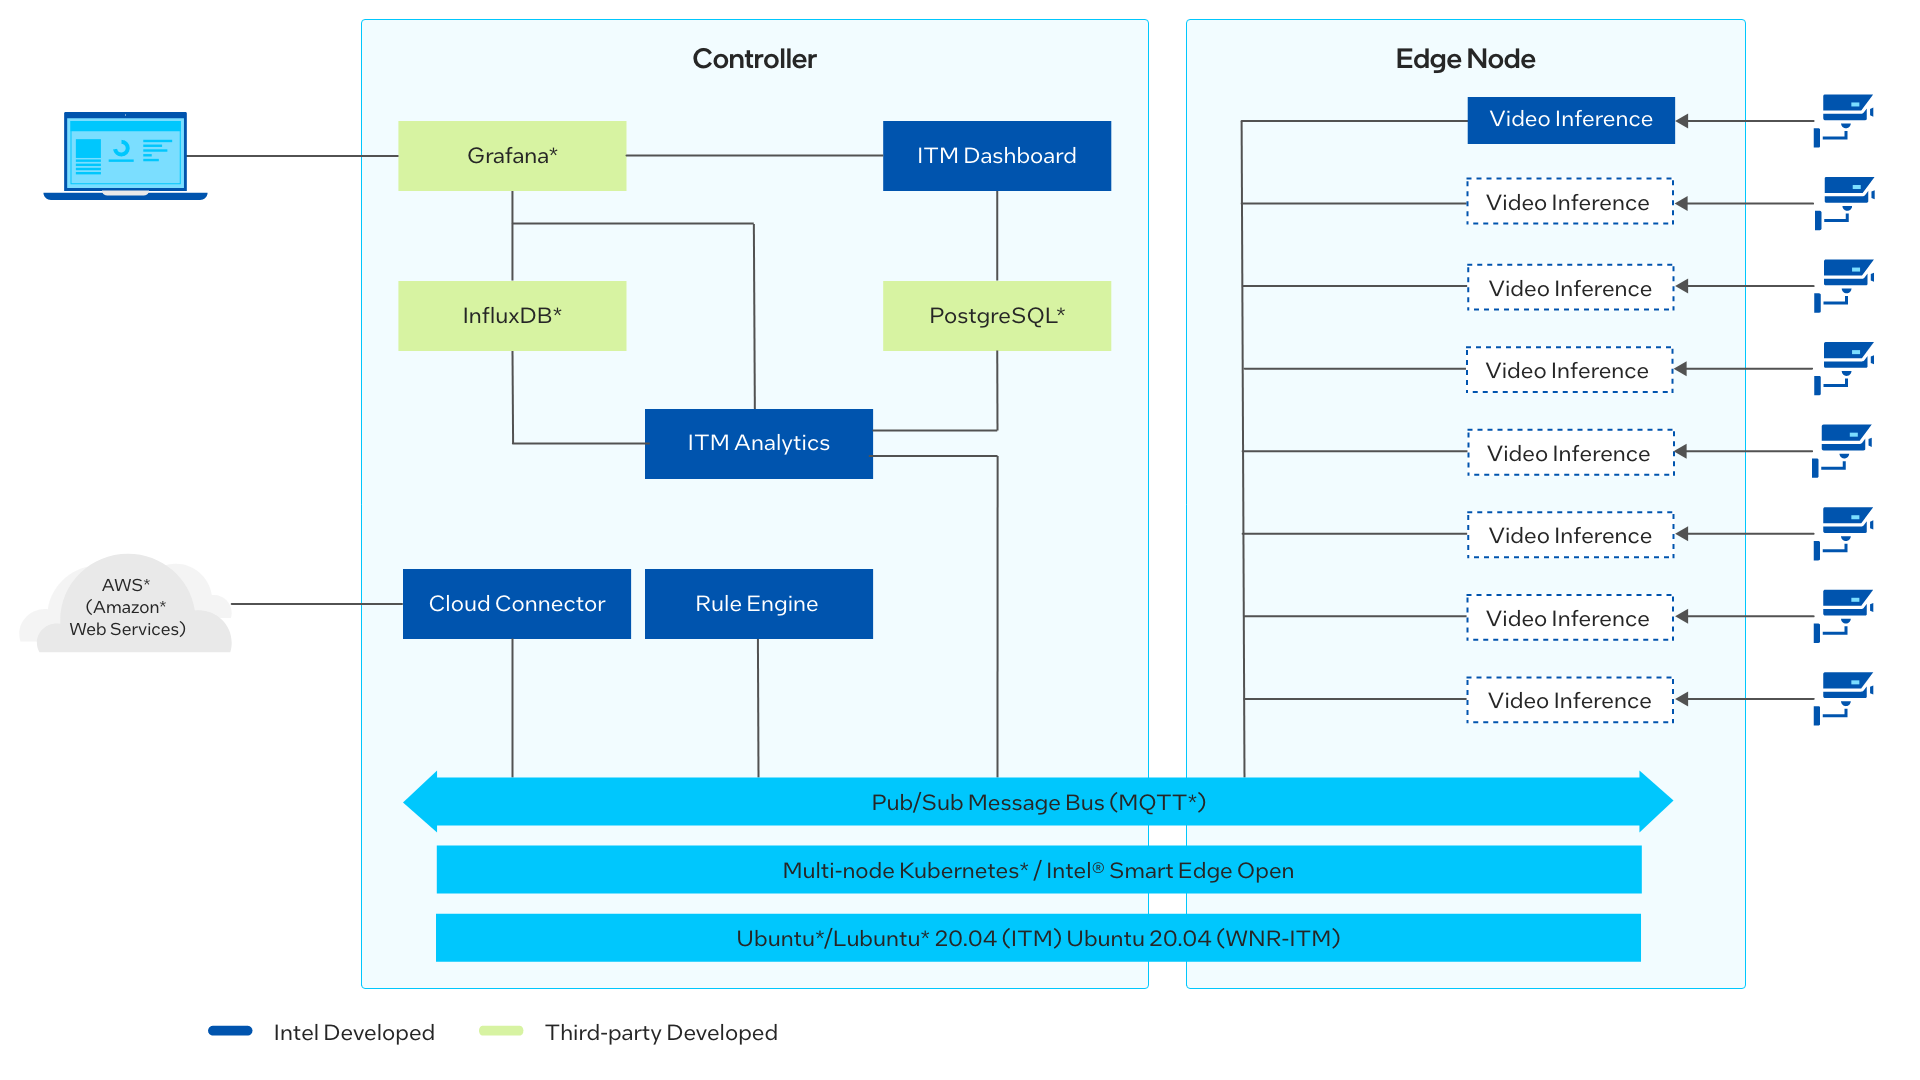
图 2:架构图
开始吧
先决条件
要运行参考实施,您需要首先下载并安装具有多节点支持的英特尔®智能边缘开放式开发人员体验套件。
确保正确满足以下条件,以确保通过 Edge Software Provisioner (ESP) Intel® Smart Edge Open Developer Experience Kit 软件包完成的参考实施的安装过程顺利进行。
在本教程中继续使用同一用户。smartedge-open
硬件要求
确保您安装了全新的 Ubuntu* 20.04 LTS 服务器,并在“目标系统要求”部分中指定了硬件。
第1步:安装参考实现
注意:以下部分可以在 URL 或命令中使用。记下 Edge 控制器的 IP 地址,并在这些说明中替换它。
<Controller_IP>
选择“配置并下载”以下载参考实现,然后按照以下步骤进行安装。
-
在继续操作之前,请确保正确满足目标系统要求。
-
如果您位于代理网络后面,请确保在系统中配置了代理地址。
-
以 smartedge-open 用户身份打开新终端,并将下载的 .zip 软件包移动到 /home/smartedge-open 文件夹。
mv path-of-downloaded-directory/wireless_network_ready_intelligent_traffic_management.zip /home/smartedge-open -
使用以下命令转到 /home/smartedge-open 目录并解压缩 RI。
-
转到目录:wireless_network_ready_intelligent_traffic_management/
-
更改可执行 edgesoftware 文件的权限以启用执行。
-
运行以下命令以安装参考实现:
-
在安装过程中,系统将提示您输入 AWS Key ID、AWS Secret、AWS Bucket 和 Product Key。产品密钥包含在您从英特尔收到的确认下载的电子邮件中。AWS 凭证是可选的。
AWS Key ID、AWS Secret 和 AWS Bucket 是在按照 Amazon Web Services* Cloud Storage Setup 部分中的步骤获取的。如果您不需要云上传功能,只需在系统提示您输入 AWS 凭证时按 Enter 键即可提供空值。
注意:安装日志位于以下路径:
/var/log/esb-cli/Wireless_NetworkReady_Intelligent_Traffic_Management_<version>/<Component_Name>/install.log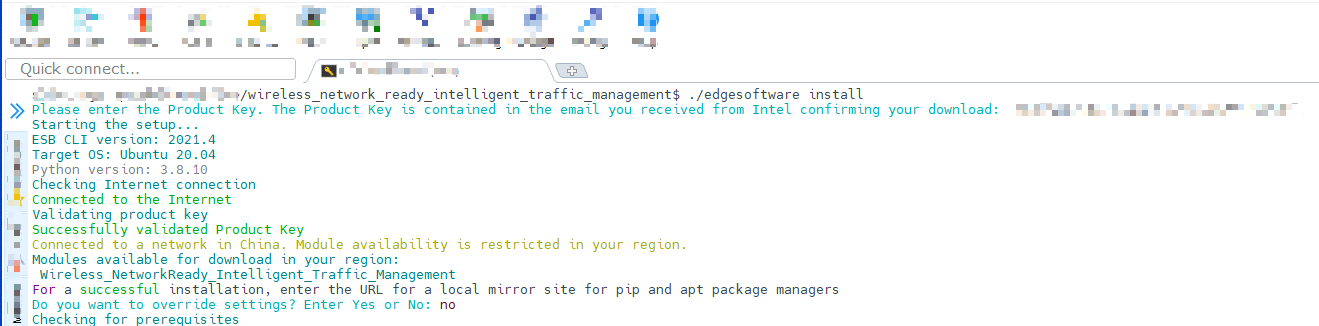
图 3:产品密钥
-
安装完成后,您会看到消息和每个模块的安装状态。
Installation of package complete
图 4:安装成功
-
® 如果英特尔智能边缘打开安装成功,运行以下命令应显示类似于下图的输出。所有 Pod 的状态都应为“正在运行”或“已完成”。
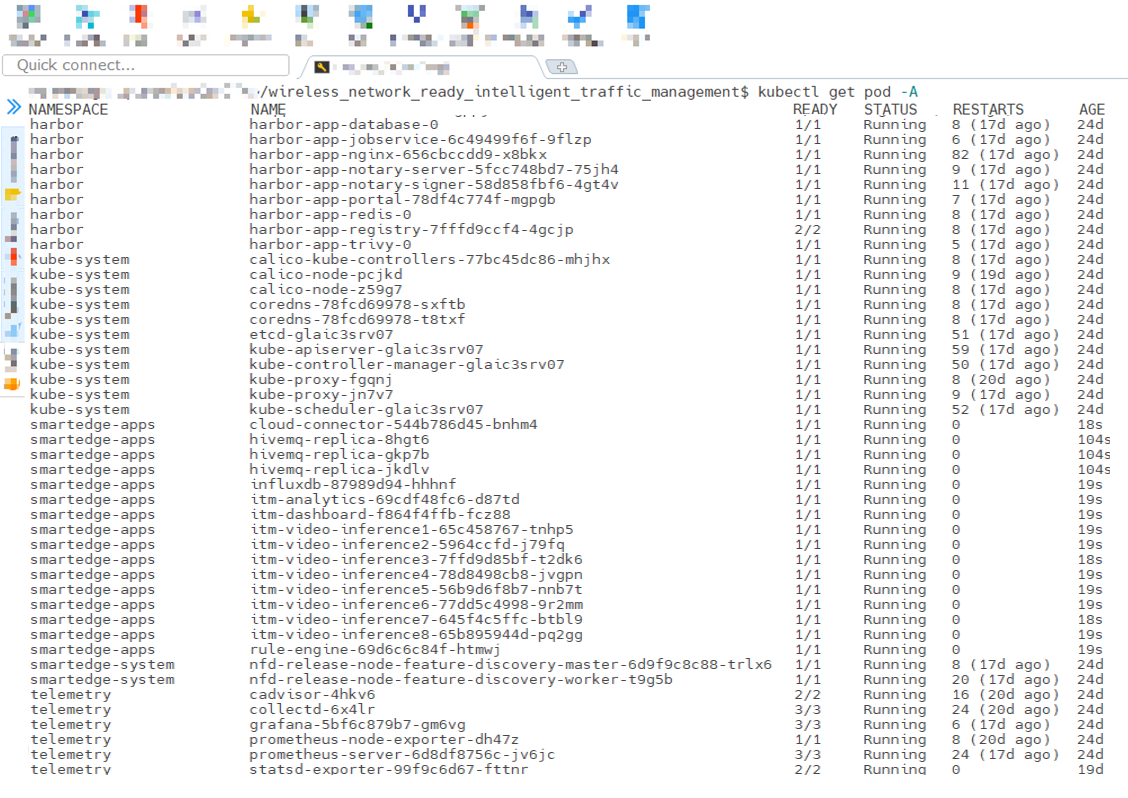
图 5:Pod 的状态
第 2 步:检查应用程序
使用以下命令检查 pod:Wireless_NetworkReady_Intelligent_Traffic_Management
您将看到类似于以下内容的输出:
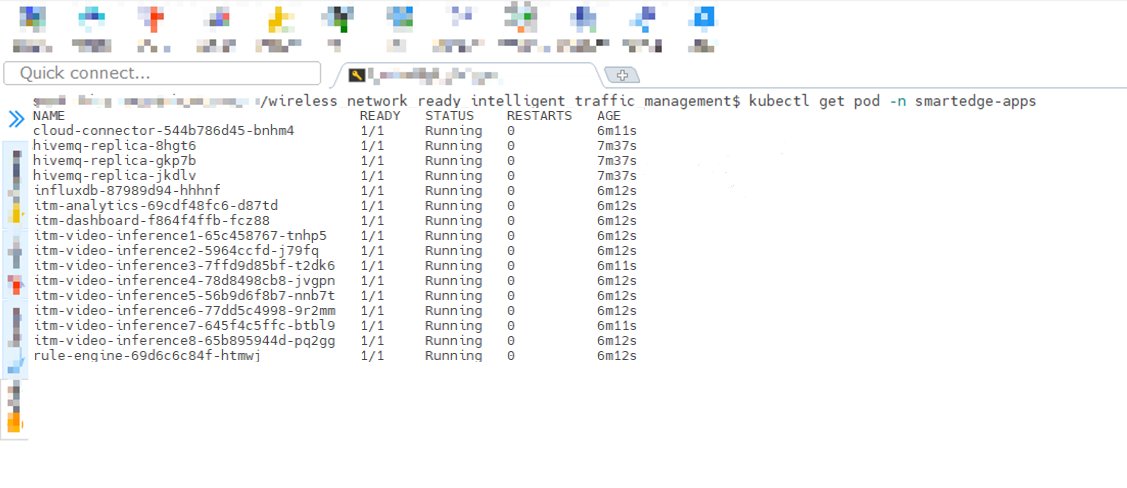
图 6:无线网络就绪 ITM Pod 的状态
注意:如果 Pod 的状态为 ,请等待一段时间,因为 Kubernetes 会从注册表中提取映像,然后部署它们。这仅在首次部署容器时发生,等待时间将取决于可用的网络带宽。
ContainerCreating
第 3 步:在 Grafana 上实现数据可视化
-
导航到 https://Controller_IP:30300/dashboard 在浏览器上检查无线网络就绪 ITM 仪表板。
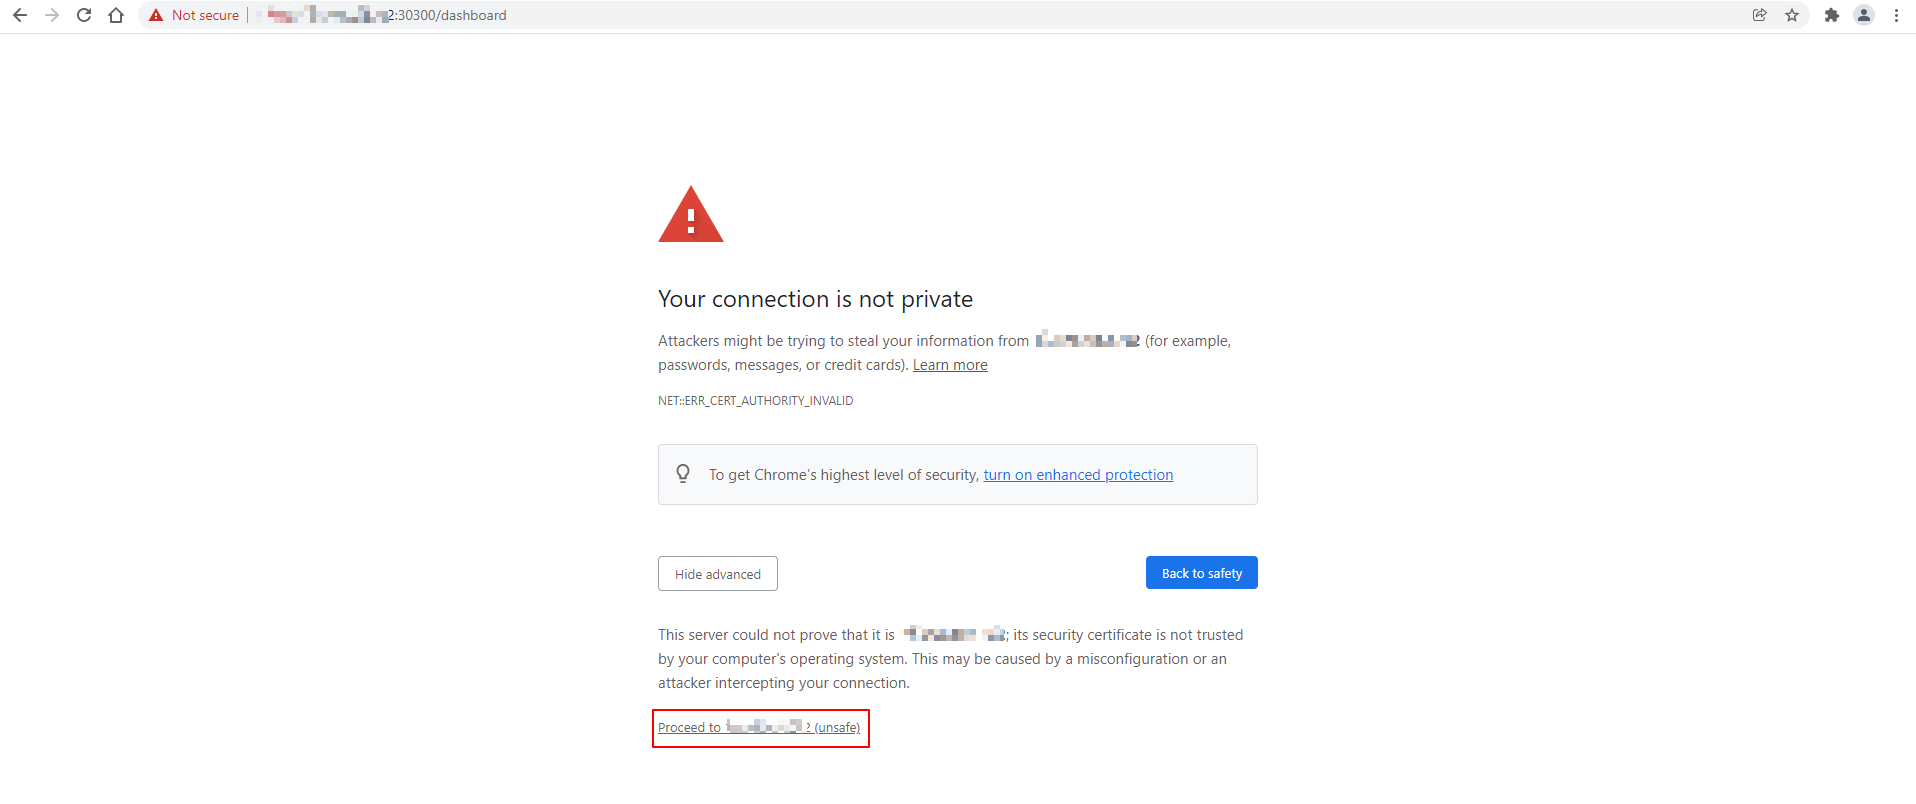
图 7:登录无线网络就绪 ITM 仪表板
-
导航到 https://Controller_IP:30303/camera/0 在浏览器上检查无线网络就绪 ITM 相机。

图 8:无线网络就绪 ITM 摄像头 0
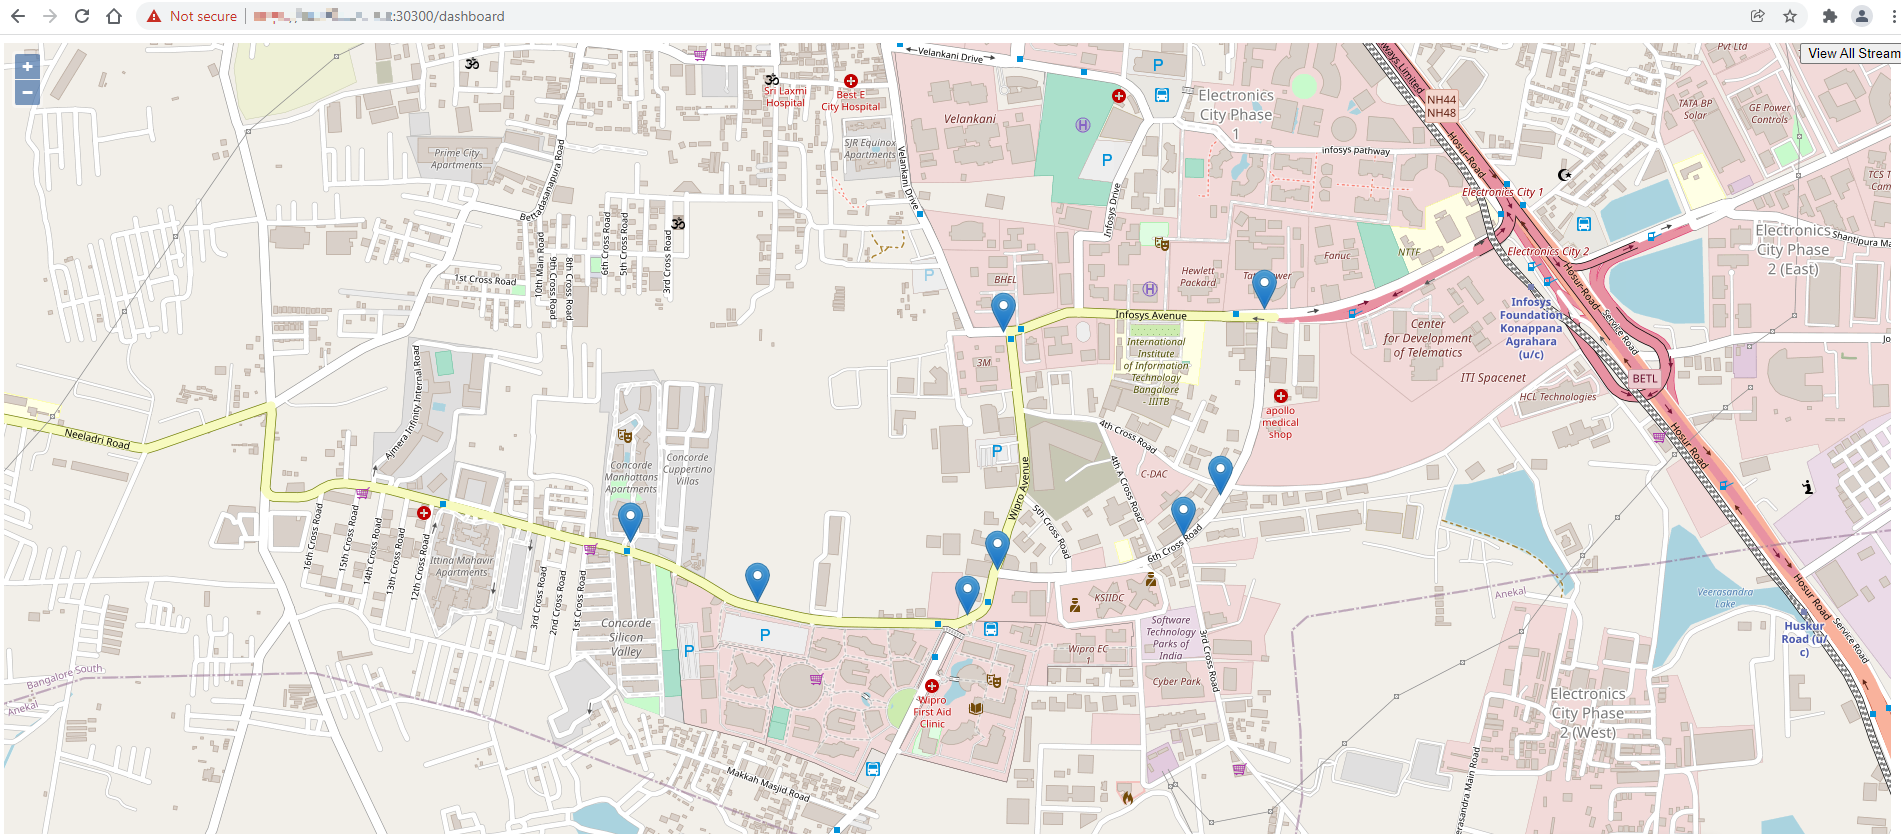
图 9:无线网络就绪 ITM 仪表板
-
导航到浏览器以登录到 Grafana 仪表板。<Controller_IP>:32000
-
通过输入以下命令获取 Grafana 密码:
-
以管理员身份登录,以 Grafana 密码登录
-
单击“主页”,然后选择 ITM 以打开主仪表板。
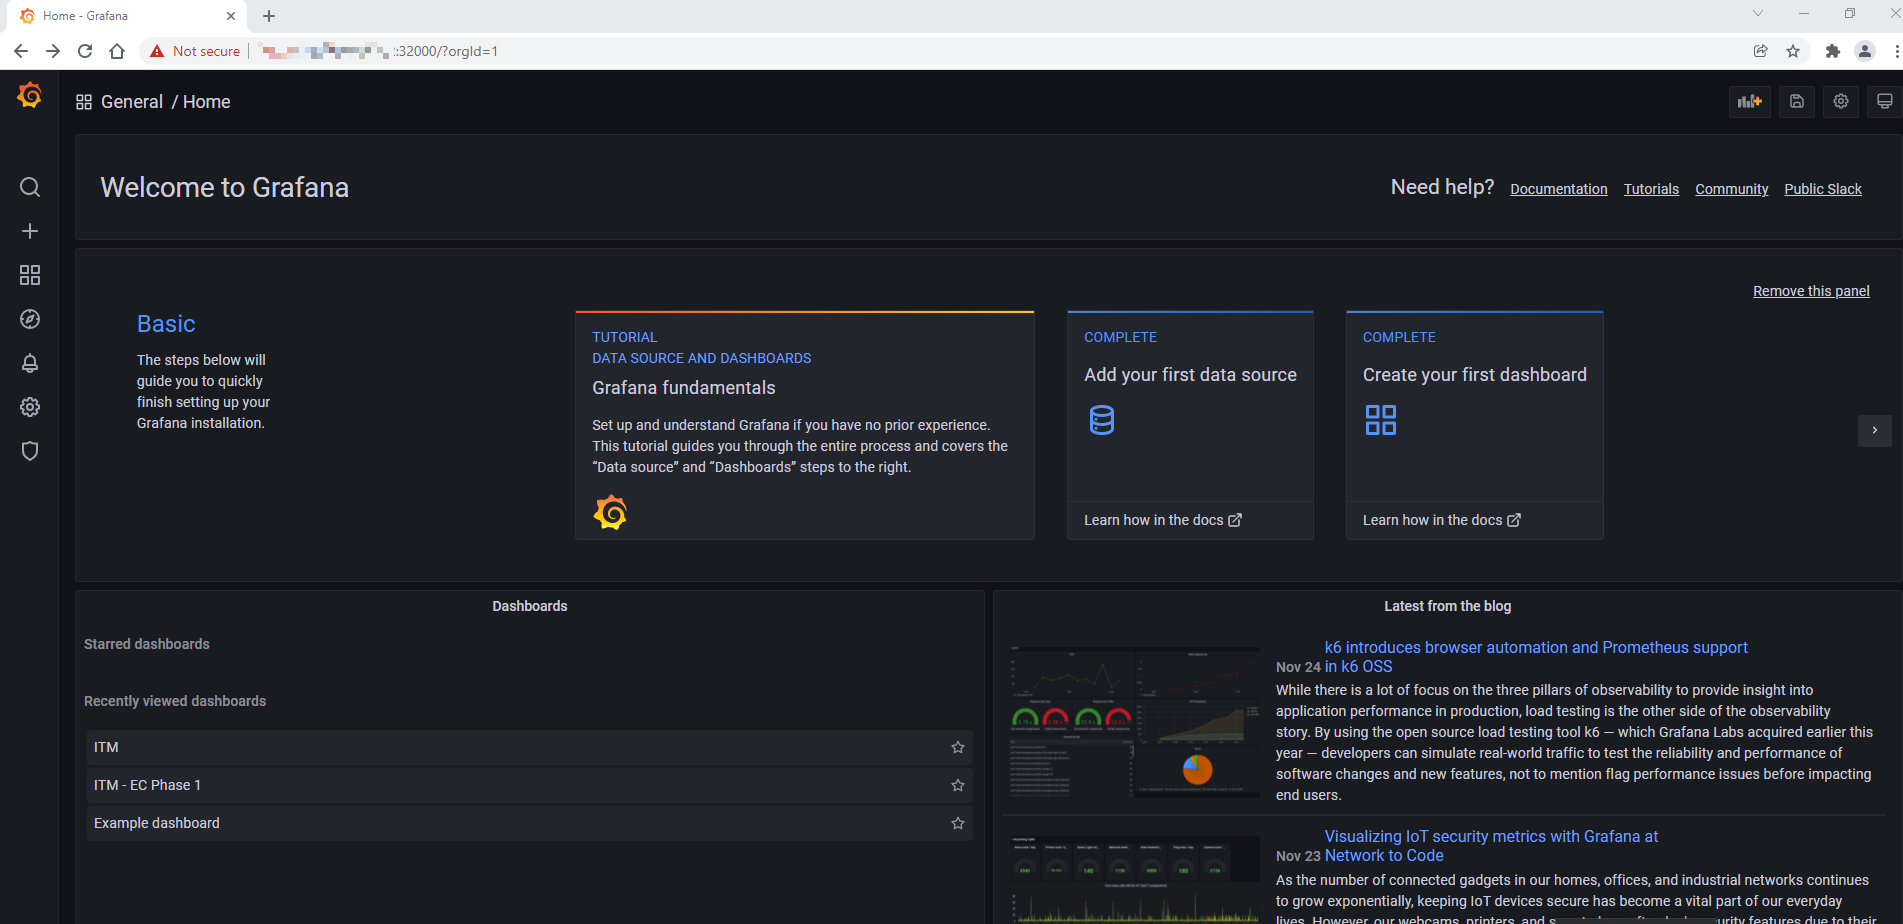
图 10:Grafana 主屏幕
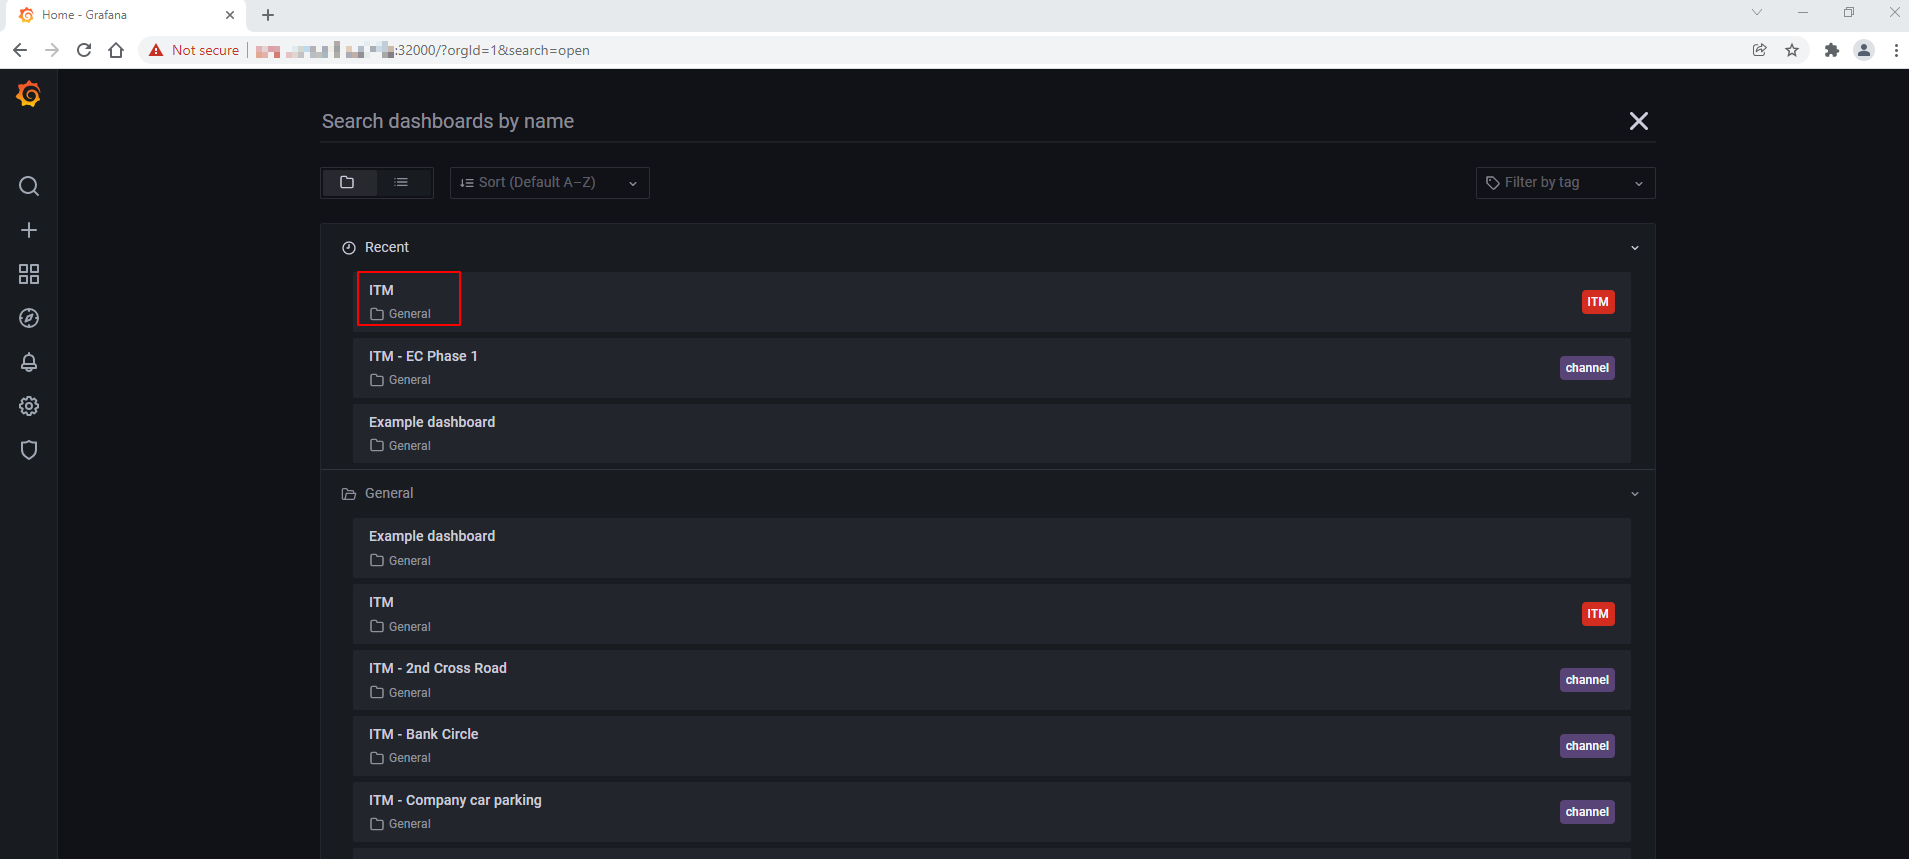
图 11:Grafana Dashboard 列表
无线网络就绪 ITM 仪表板的示例:
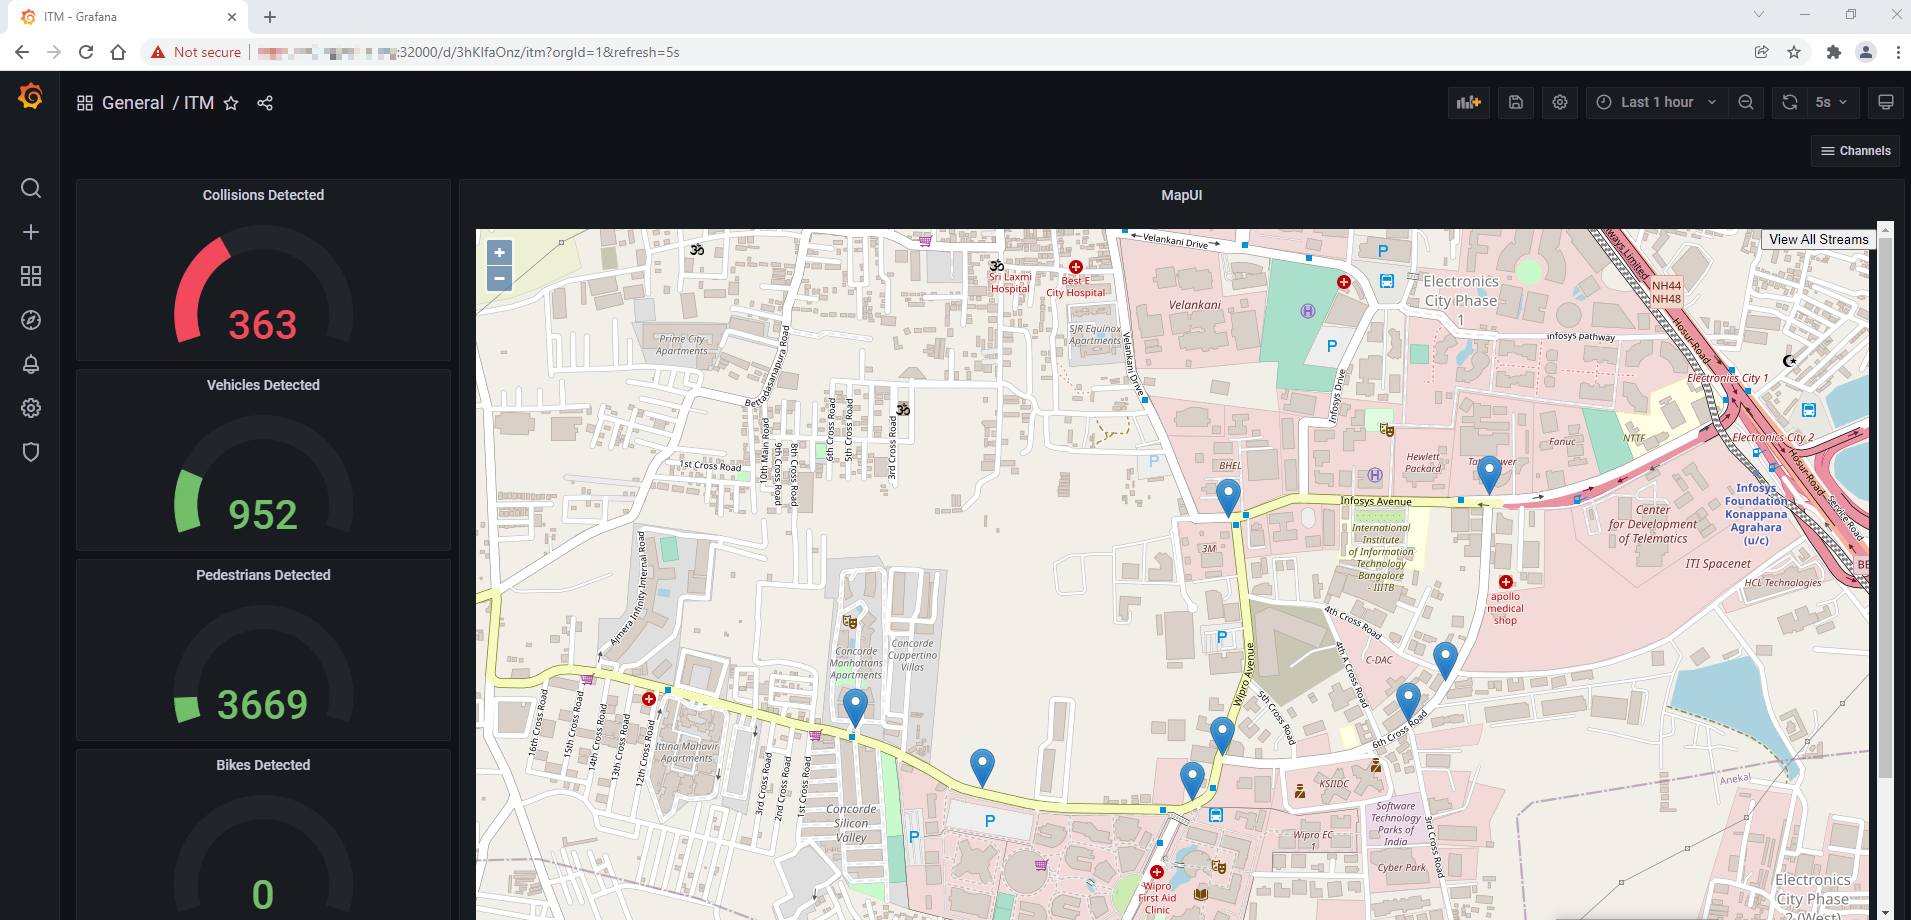
图 12:Grafana 主仪表板 – 无线网络就绪 ITM
上面的仪表板显示了左侧检测到的车辆、行人和碰撞的数量。如果检测到碰撞,这些可用于调整交通信号灯和呼叫紧急服务。
地图上的蓝色图钉是相机的地理坐标。通过单击这些引脚,可以看到带有检测结果的相机馈送的小窗口,如下图所示。
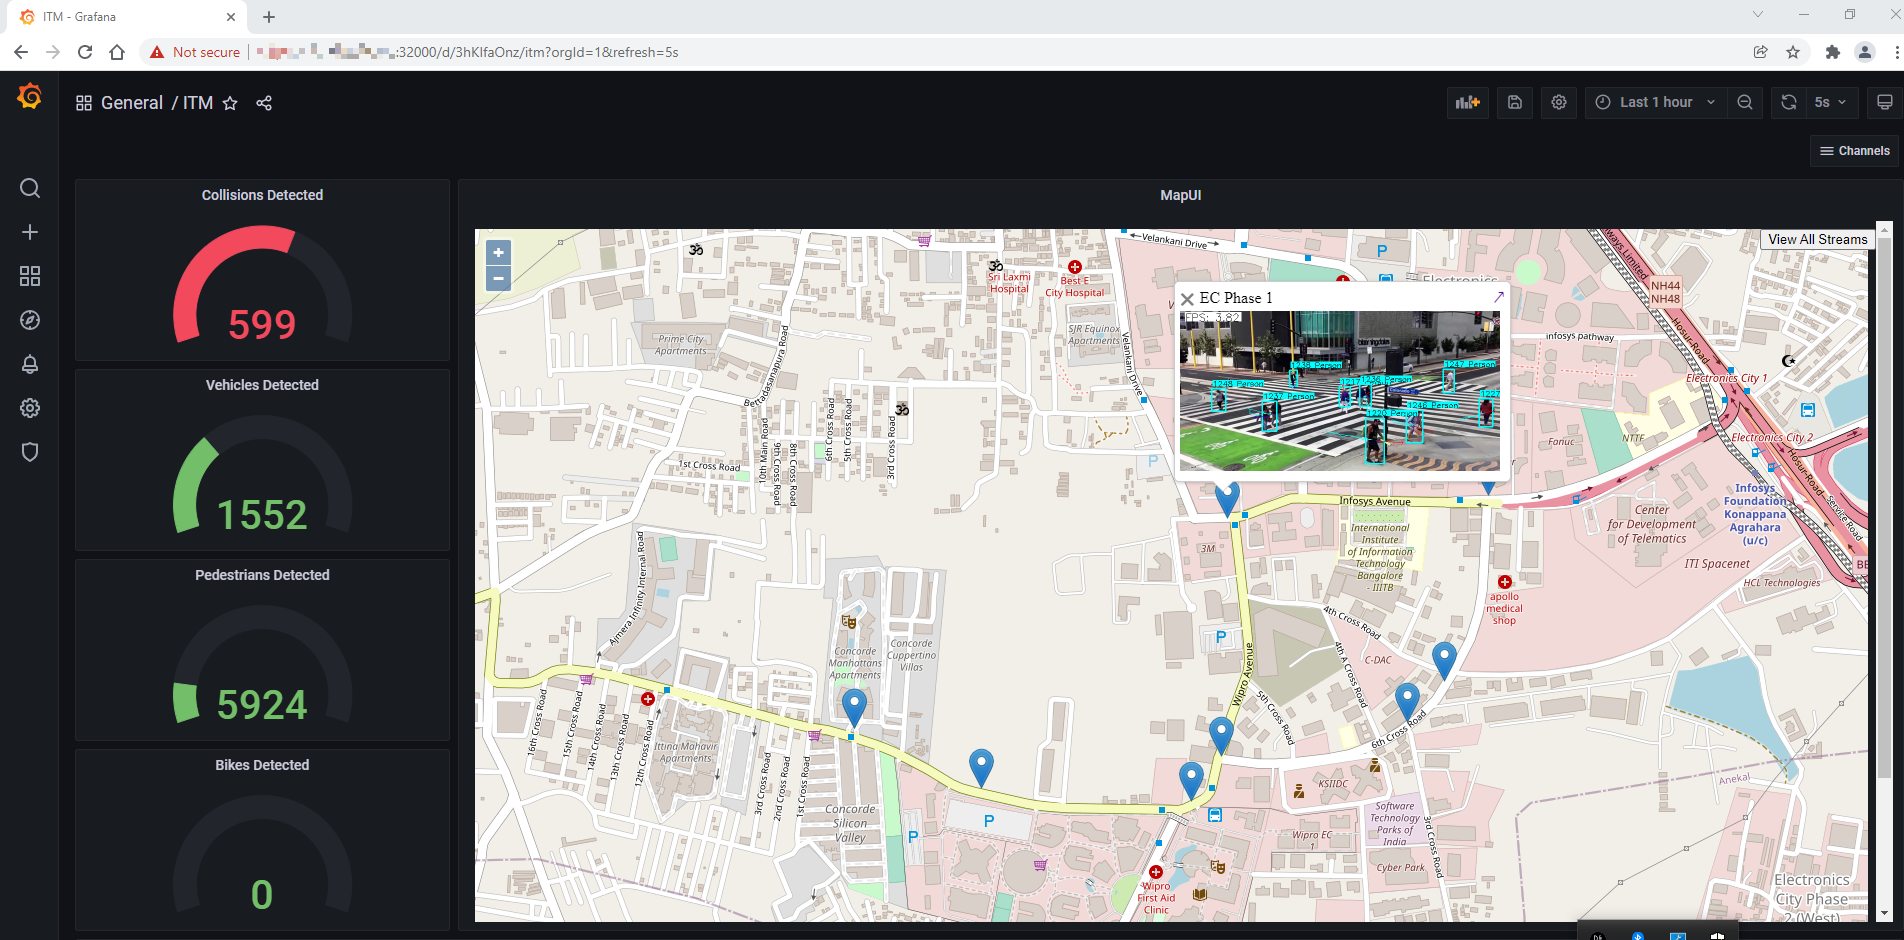
图 13:MapUI 上的检测结果
要打开特定相机的 Grafana 仪表板,其中包含检测结果和其他数据指标,请单击小窗口中的相机源,如下图所示。
注意:要关闭带有摄像头源的小窗口,请单击窗口左上角的关闭按钮 (X)。
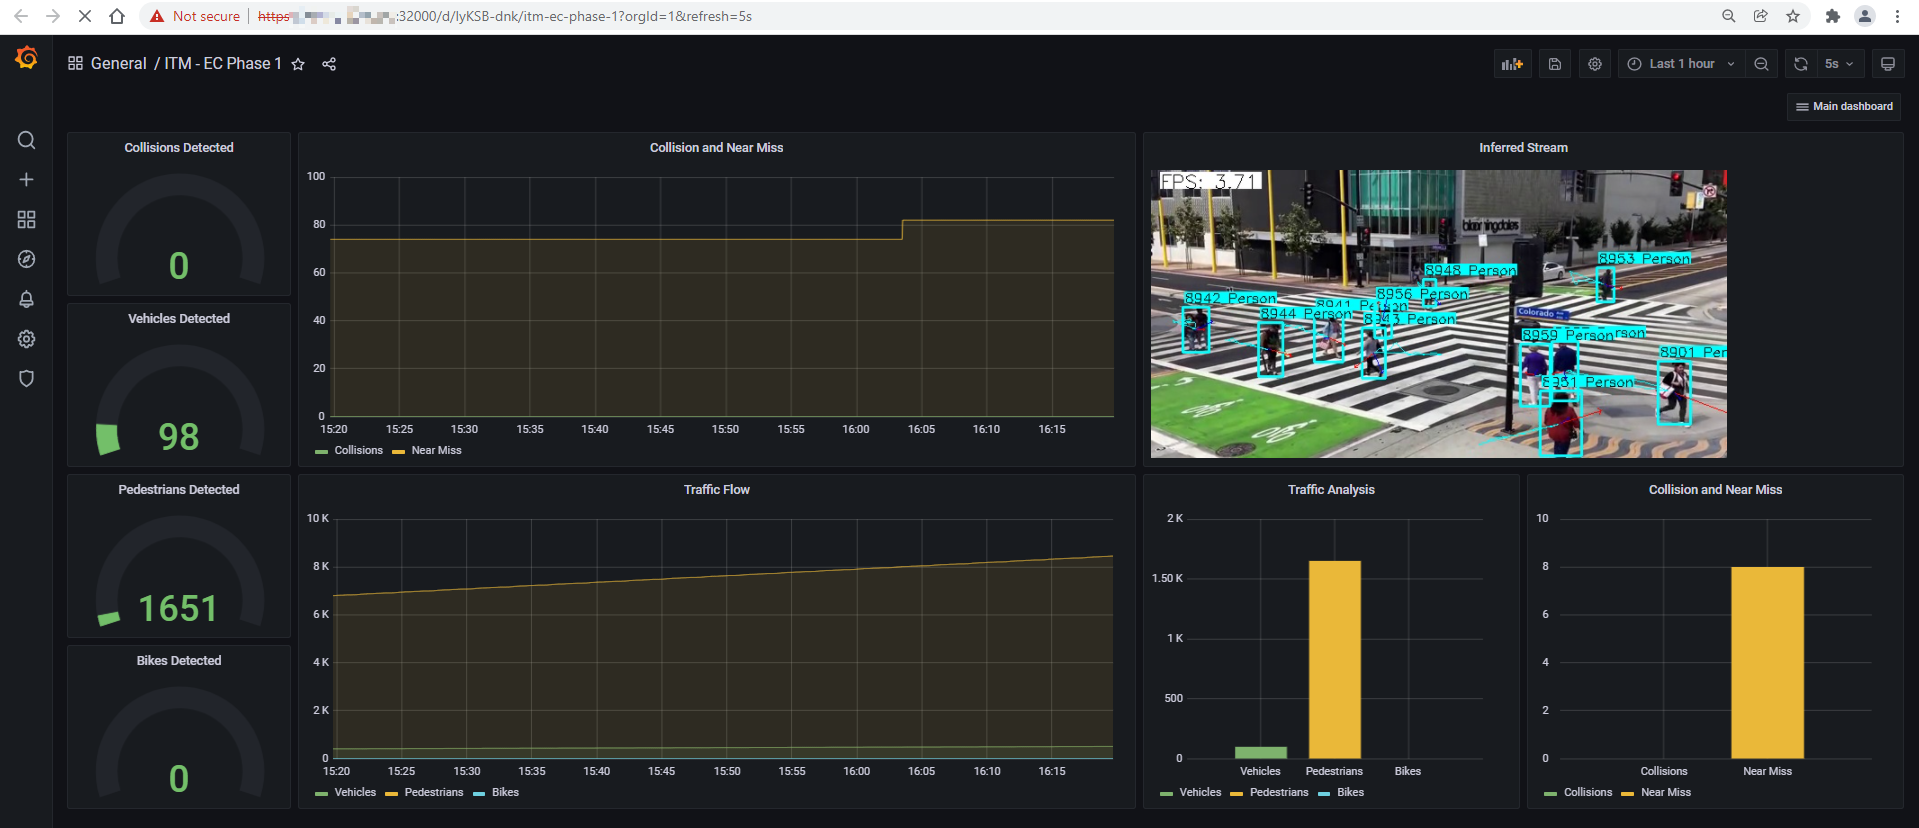
图 14:单个摄像头源的 Grafana 仪表板
要查看所有配置的摄像机源的检测结果,请单击主 Grafana 仪表板(即 ITM)的 MapUI 右上角的查看所有流。请参阅图 12:Grafana 主仪表板 – 无线网络就绪 ITM。
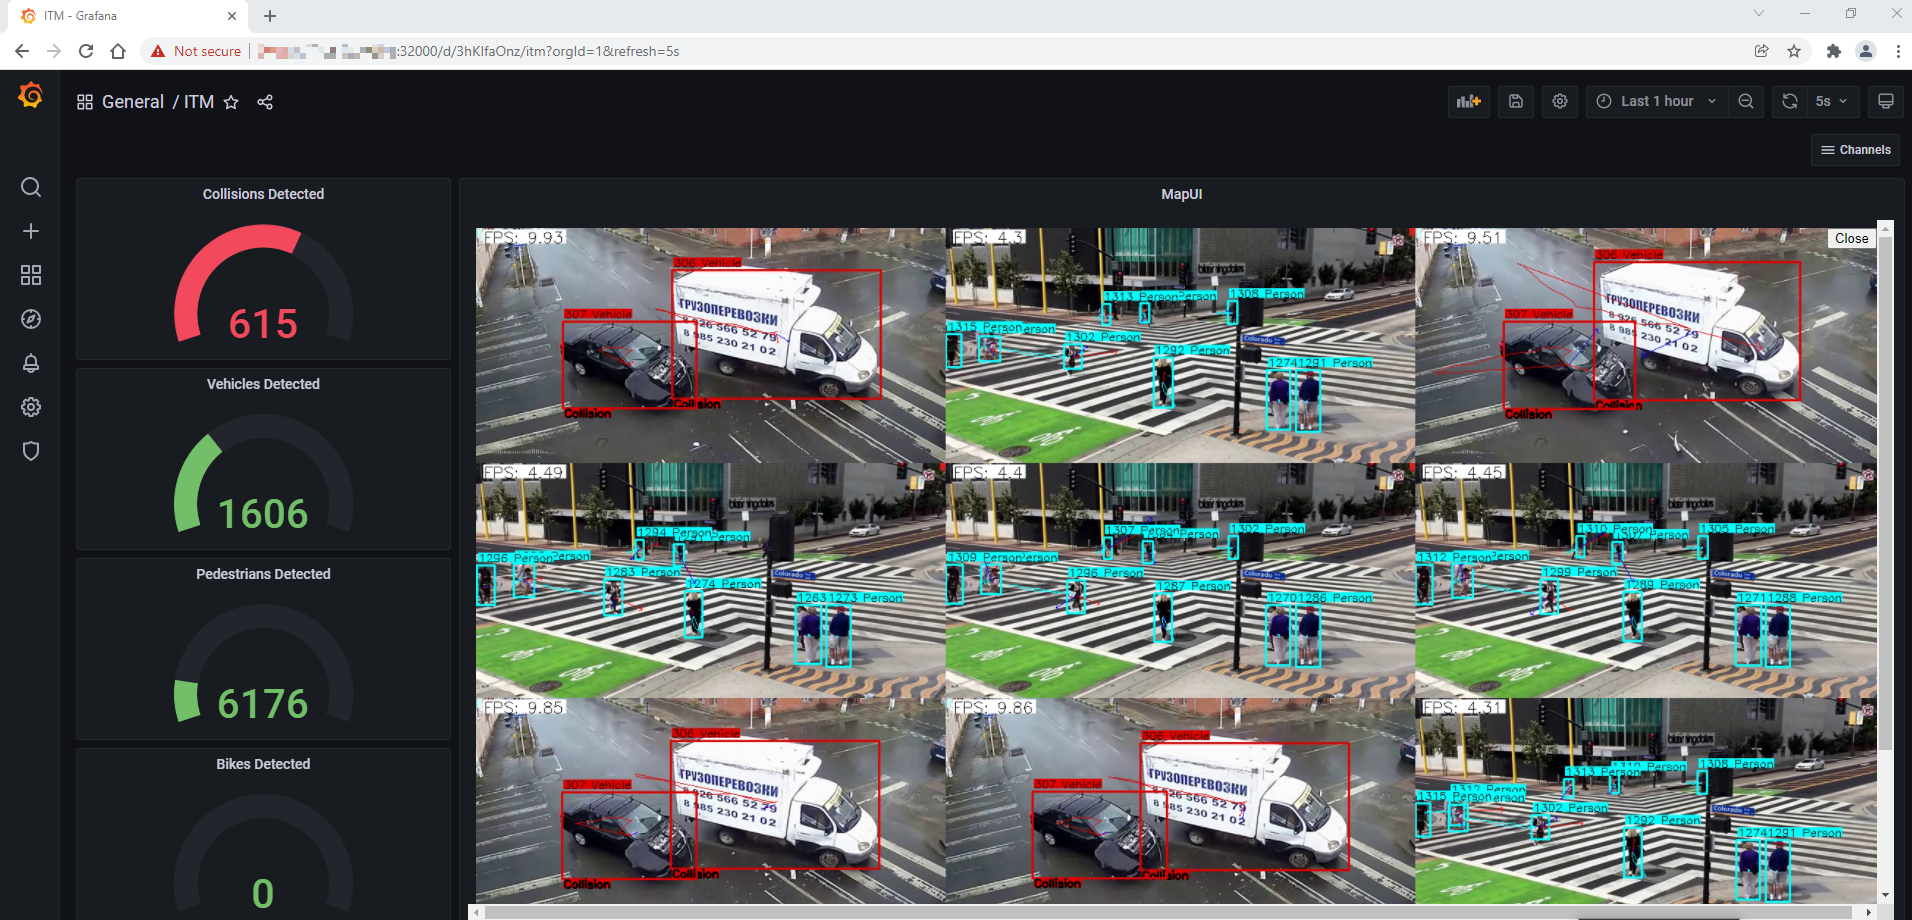
图 15:所有配置的摄像头源的检测结果
注意:在完整选项卡中打开组合流,请转到:https://<Controller_IP>:30303/get_all_streams
如果在安装步骤中提供了 AWS 凭证,则您启用了云上传功能。
导航到配置的 AWS 存储以查找上传的视频捕获。
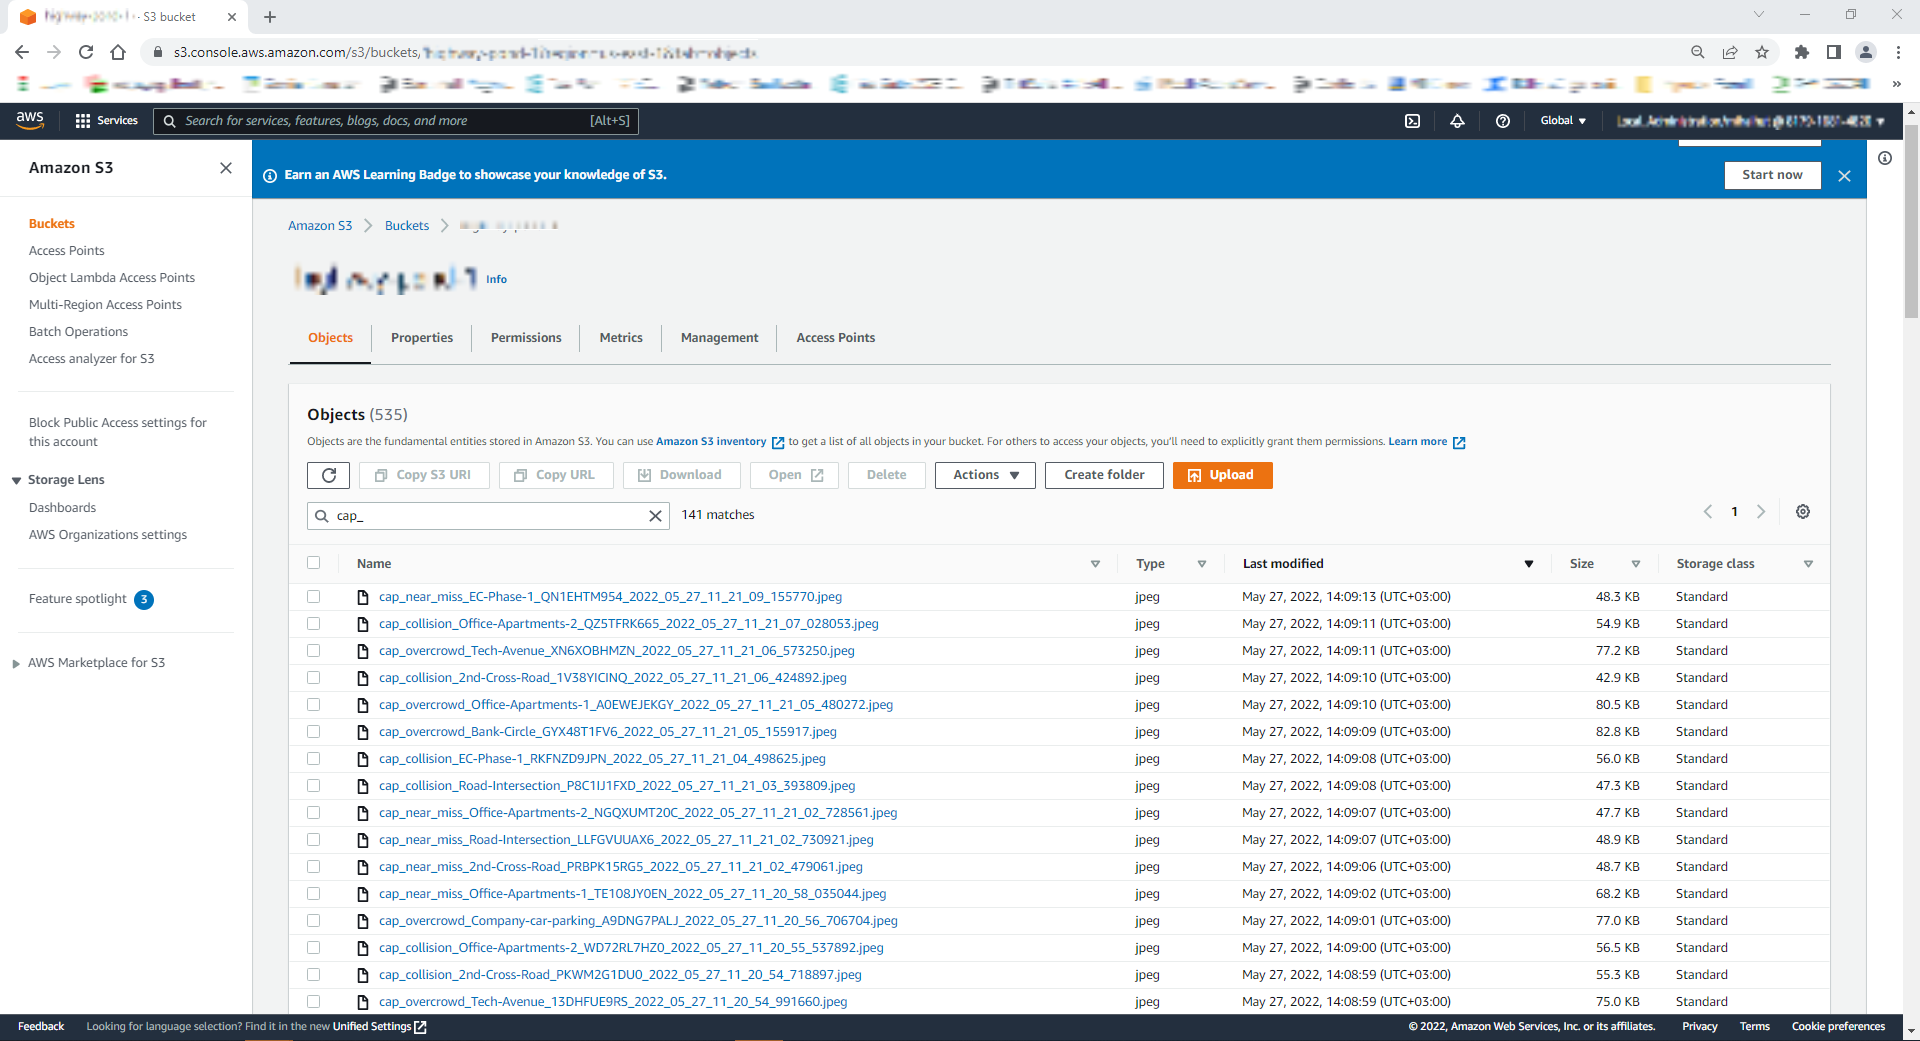
图 16:AWS S3 存储桶对象列表
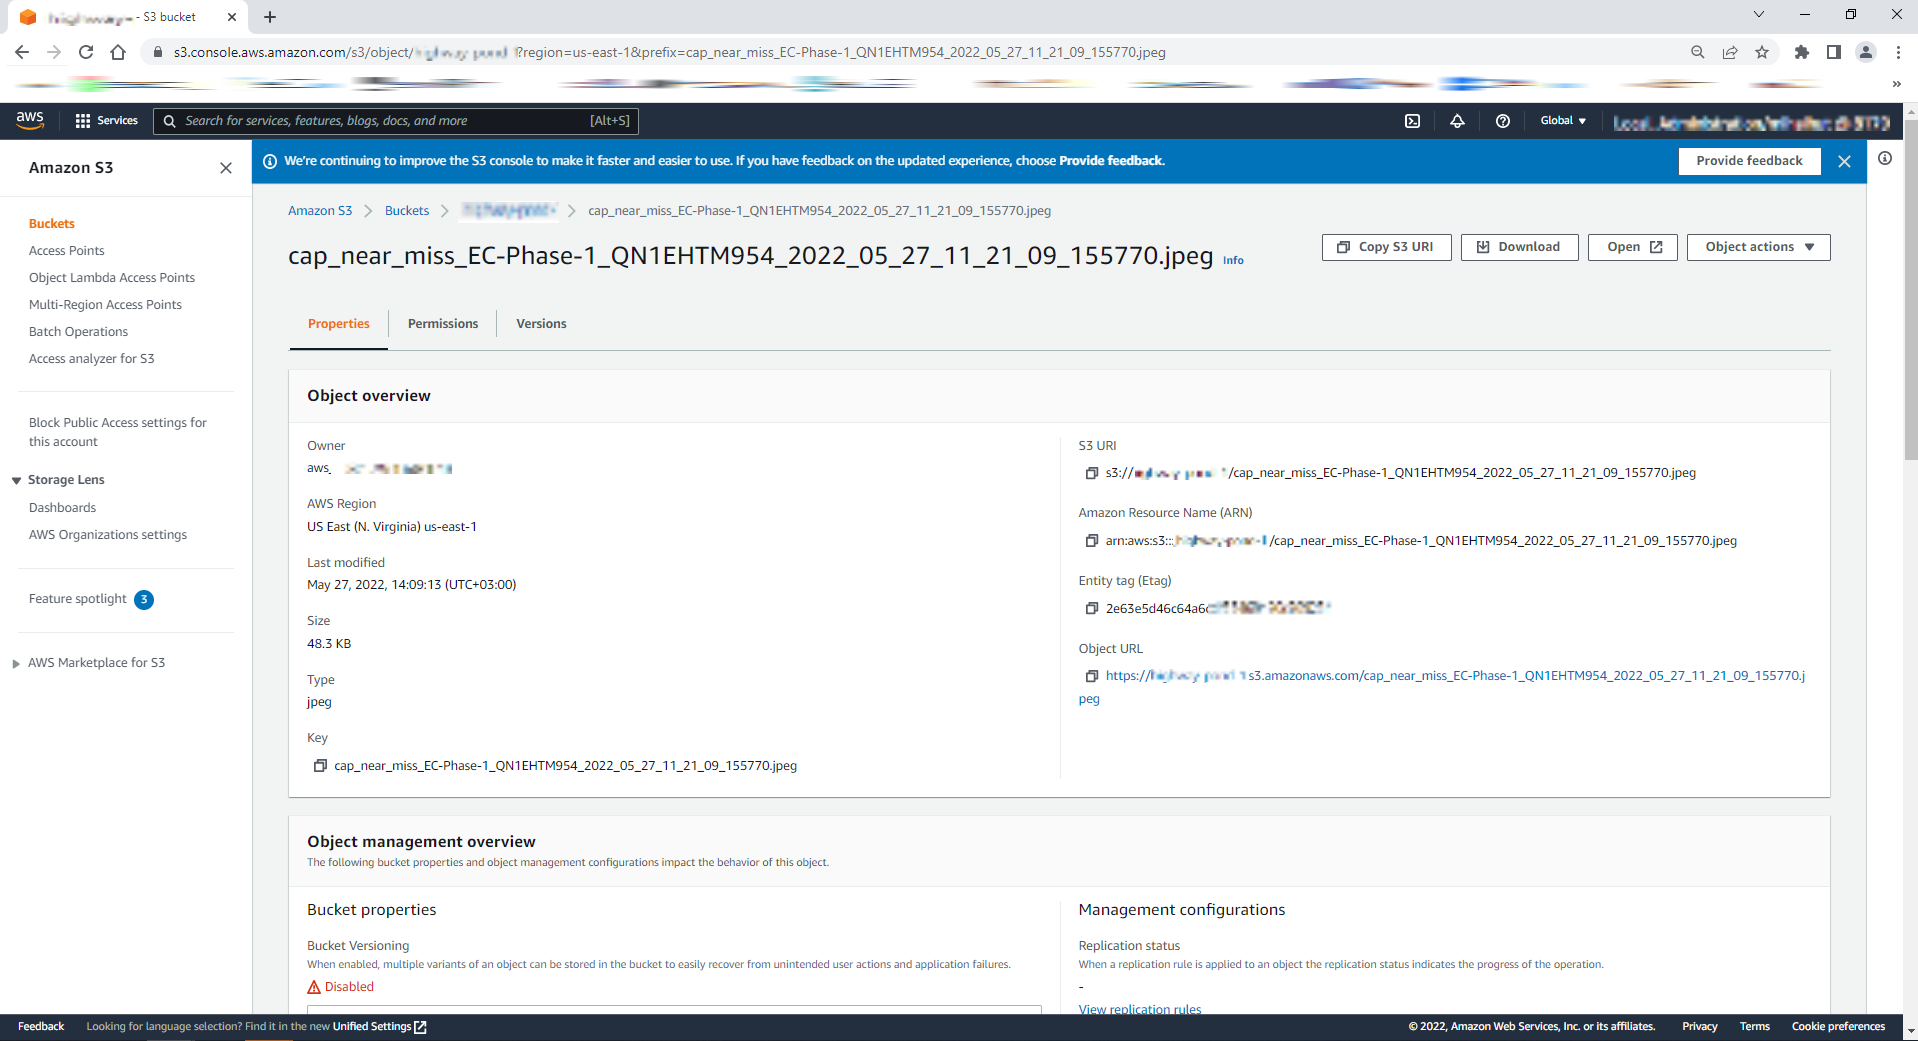
图 17:AWS S3 存储桶对象属性
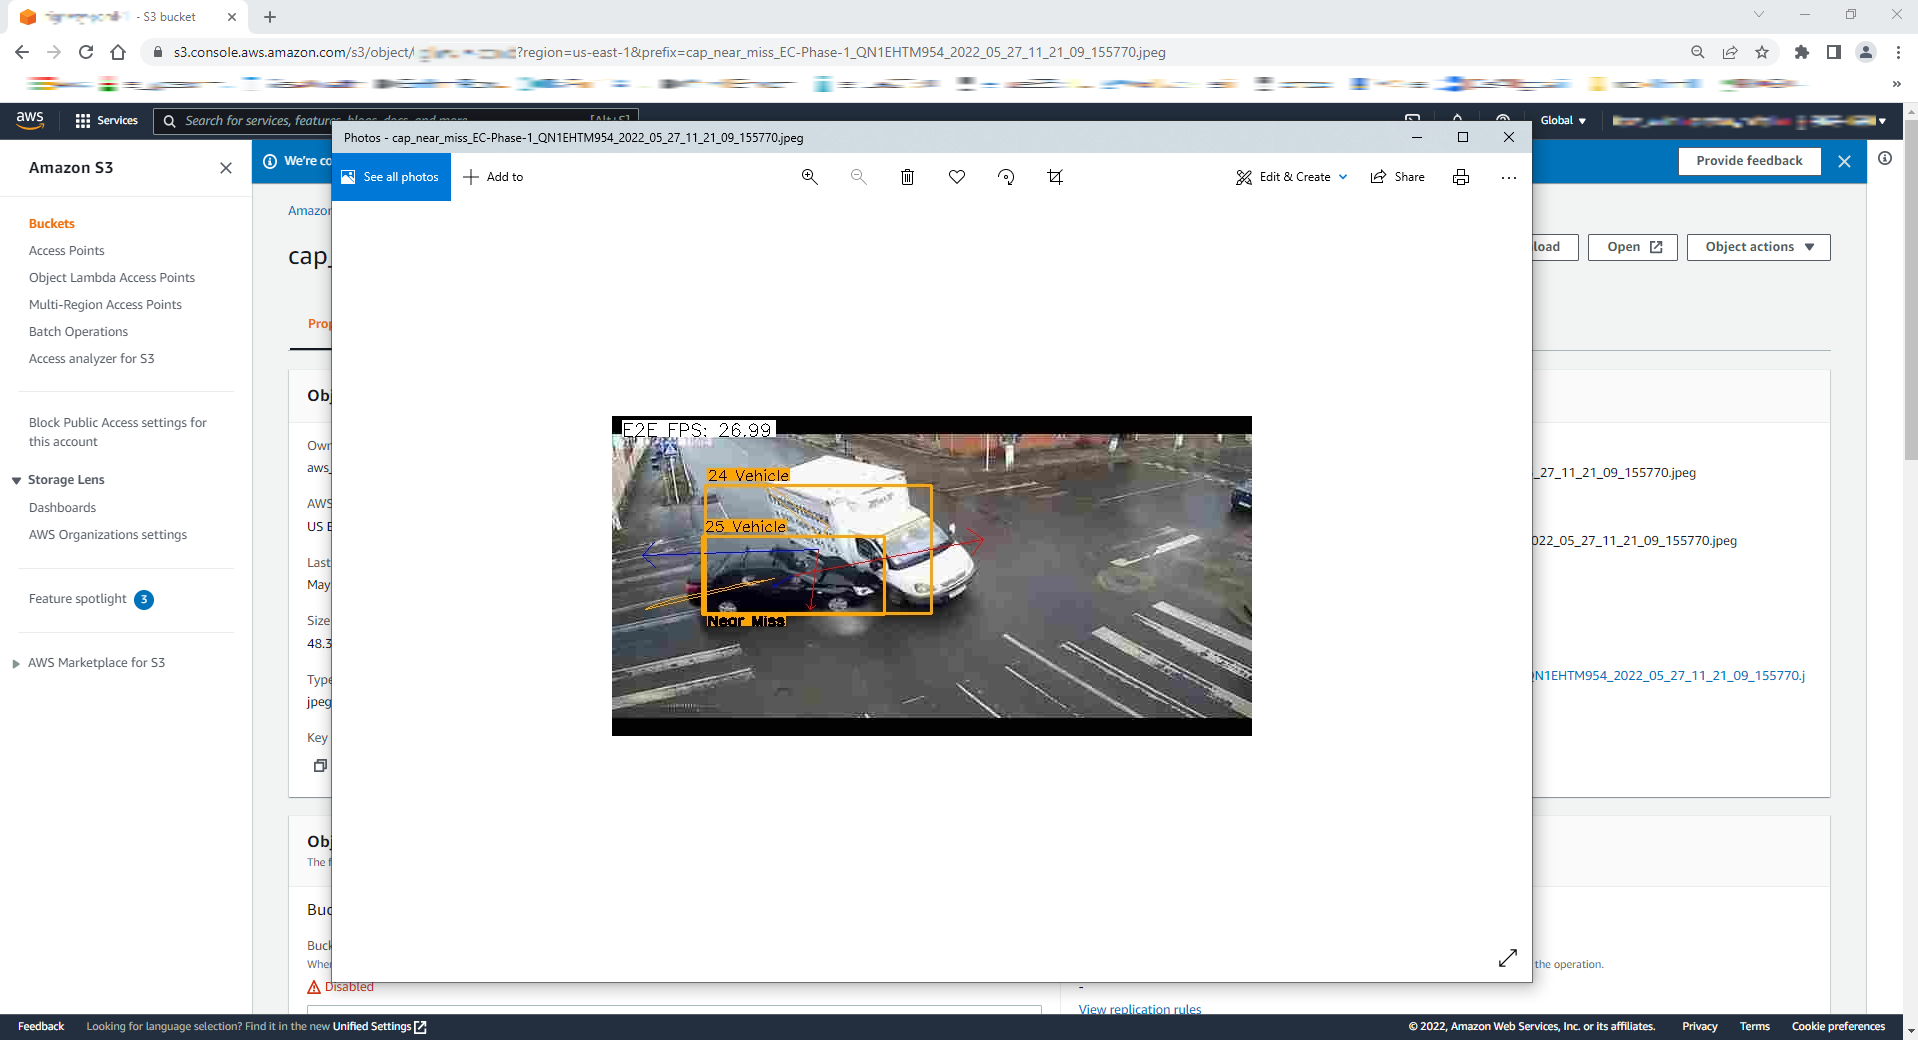
图 18:AWS S3 存储桶对象照片
第 4 步:卸载应用程序
-
使用以下命令检查已安装的模块:
所有已安装的模块将如下图所示:
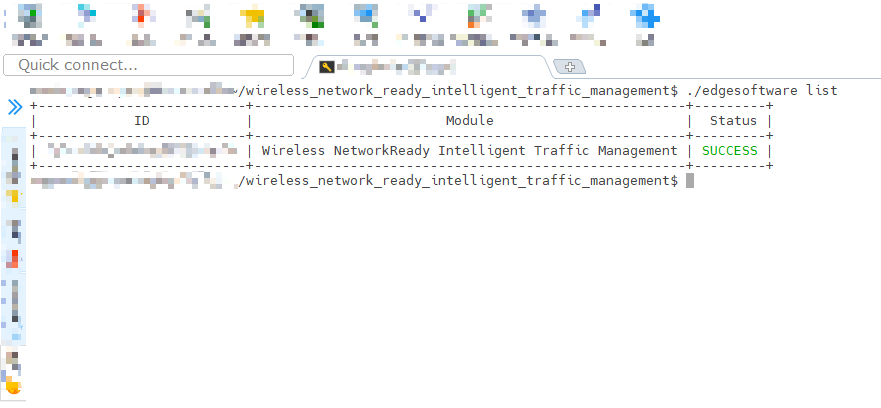
图 19:已安装的模块列表
-
运行以下命令以卸载所有模块:
-
运行以下命令以卸载无线网络就绪 ITM 参考实现:
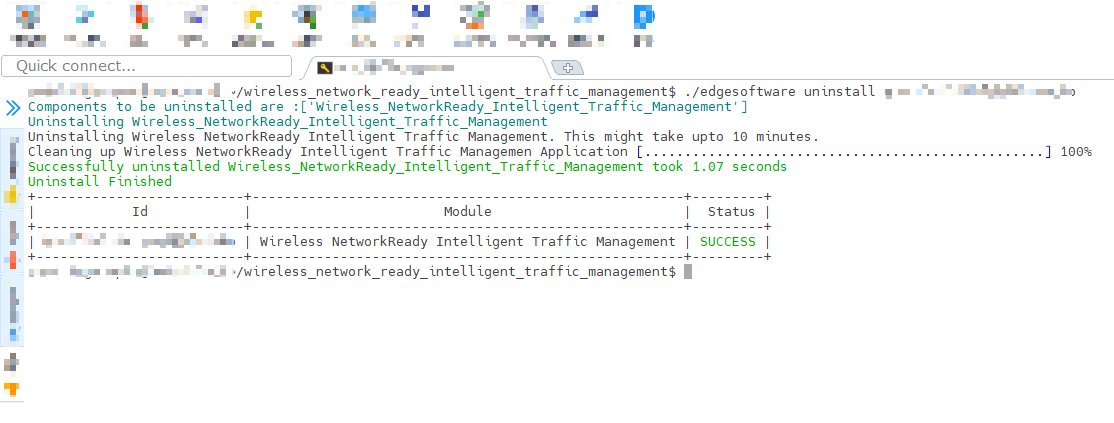
图 20:已卸载的模块
节点特征发现 (NFD)
无线网络就绪智能流量管理使用英特尔®发行版 OpenVINO™ 工具套件,该套件针对支持特殊指令(如AVX512VNNI)的英特尔®处理器进行了优化,以优化性能。此应用程序的部署将需要节点上支持此功能的节点以及 Ubuntu 20.04 操作系统。此 NFD 功能可确保在这些功能支持的节点上部署应用程序。NFD 由英特尔® Smart Edge Open 开发人员体验套件安装,并在英特尔® Smart Edge Open 上作为两个 Pod 运行。
基于英特尔®至强®可扩展服务器的硬件功能,在英特尔®智能边缘开放节点上成功调度和运行无线网络就绪智能流量管理 Pod。
Helm 图表的公共 Helm 注册表
在英特尔® Smart Edge Open 上安装无线网络就绪智能流量管理参考实施是使用 Helm 图表完成的。早期的 Helm 图表曾经是参考实现安装包的一部分。现在,已发布全局 Helm 存储库,以便可以从专用和公共网络访问参考实现 Helm 图表。这将加快和简化引入更新及其与参考实现的集成的过程。
本地构建说明
从先决条件中安装英特尔®智能边缘开放式开发人员体验套件后,您可以使用以下说明构建自己的无线网络就绪智能流量管理 Docker 映像。
可以使用 edgesoftware 源或 GitHub 源继续执行提供的步骤: WNR-ITM 存储库
设置
使用以下选项之一将目录更改为存储库路径。
对于 Edgesoftware:
对于 GitHub:
使用首选文本编辑器进行以下文件更新。
在接下来的步骤中,标记指示存储库的路径。<REPOSITORY_PATH>
在更改示例中,将 - 指示的行替换为 + 指示的行
-
/src/build_images.sh - 更新映像的标签和版本。
-
/helm/services/values.yaml - 更新镜像部署港湾。
-
/helm/services/values.yaml - 更新版本。
构建和安装
使用以下命令生成 Docker 映像:
使用以下命令安装 Helm:
-
获取 Grafana 密码:
-
使用以下命令获取 Grafana 服务 IP:
-
使用以下命令获取主机 IP:
-
将目录从存储库路径更改为部署目录:
-
部署 MQTT 代理并等待其初始化:
-
使用步骤 1 和 2 中的主机 IP、Grafana 服务 IP 和密码,运行以下 Helm 安装命令:
笔记:
如果您的主机不在防火墙后面,请跳过设置 http 和 https 代理。
Cloud Connector 需要您的 AWS 凭证连接到它,以便在发生碰撞、未遂事故和过度拥挤事件时上传视频捕获。如果您不想启用此功能,请跳过设置这些参数。有关如何配置 AWS 的说明,请参阅设置 Amazon Web Services* 云存储部分。
如果上述命令失败并出现与 PostgreSQL 依赖项相关的错误,请执行以下命令:
helm dependency build services/
步骤 6 完成后,使用首选浏览器访问 WNR ITM,网址为: 和 Grafana https://Controller_IP:30300https://Controller_IP:32000
可选步骤
配置输入
Helm 模板包含相机的所有必要配置。
如果要更改输入,请编辑文件并将视频输入添加到test_videos数组:./helm/services/values.yaml
若要使用相机流而不是视频,请将视频文件名替换为 。/dev/video0
若要使用 RTSP 流而不是视频,请将视频文件名替换为 RTSP 链接。
每个 ITM 视频推理服务将按上述顺序选择一个视频输入。
如果要更改摄像机的坐标、地址和分析类型,请编辑文件:./helm/services/templates/itm-analytics-configmap.yaml
-
address:相机地理位置的名称。必须是非空的字母数字字符串。
-
latitude:相机地理位置的纬度。
-
longitude:相机地理位置的经度。
-
analytics:模型要检测的属性。
注意:默认模型支持行人、车辆和自行车检测。您可以从中选择所需的属性。(例如:“analytics”: “行人车辆检测”)
停止应用程序
若要删除此参考实现的部署,请运行以下命令。
注意:以下命令将删除设备中存储的所有正在运行的 Pod 以及数据和配置,MQTT Broker 除外。
如果您也希望删除 MQTT 代理,请输入以下命令:
设置亚马逊云科技云* 存储
要在已安装的参考实施上启用 Cloud Storage,您需要 Amazon Web Services* (AWS*) 付费/免费订阅才能启用必须支持以下服务的根用户账户:
- 身份认证管理 (IAM)
- Amazon S3 存储桶
完成 IAM 和 S3 的设置后,您将拥有 ,并用于您的无线网络就绪智能流量管理云连接器 - 配置。AWS_KEY_IDAWS_SECRET_KEYAWS_BUCKET_NAME
引用
设置步骤
-
在 AWS 管理控制台中,搜索 IAM 并打开 IAM 控制面板。
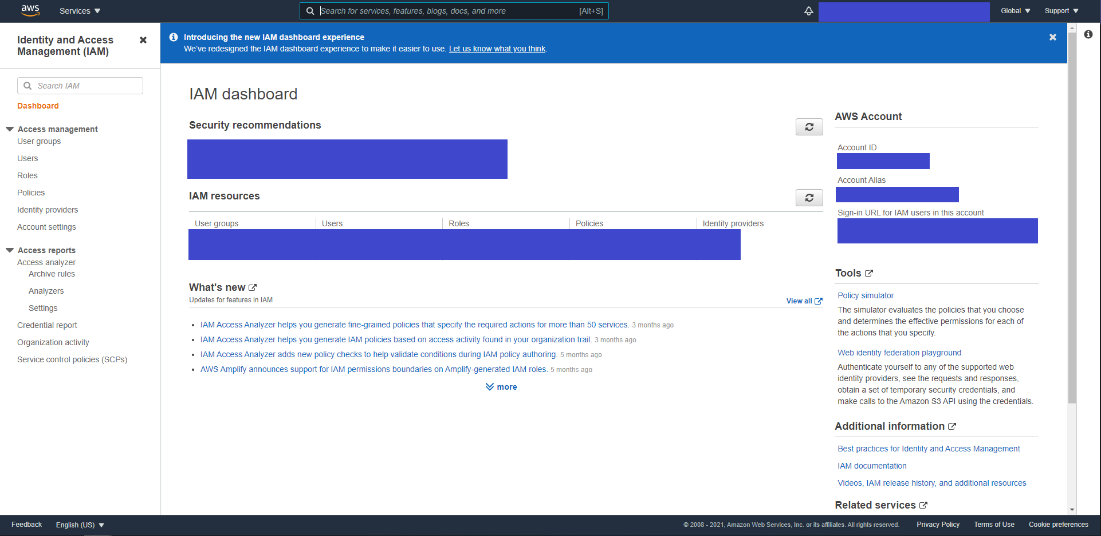
图 21:IAM 控制面板
-
在控制面板的左侧菜单中,转到访问管理,然后单击用户以打开 IAM 用户选项卡。
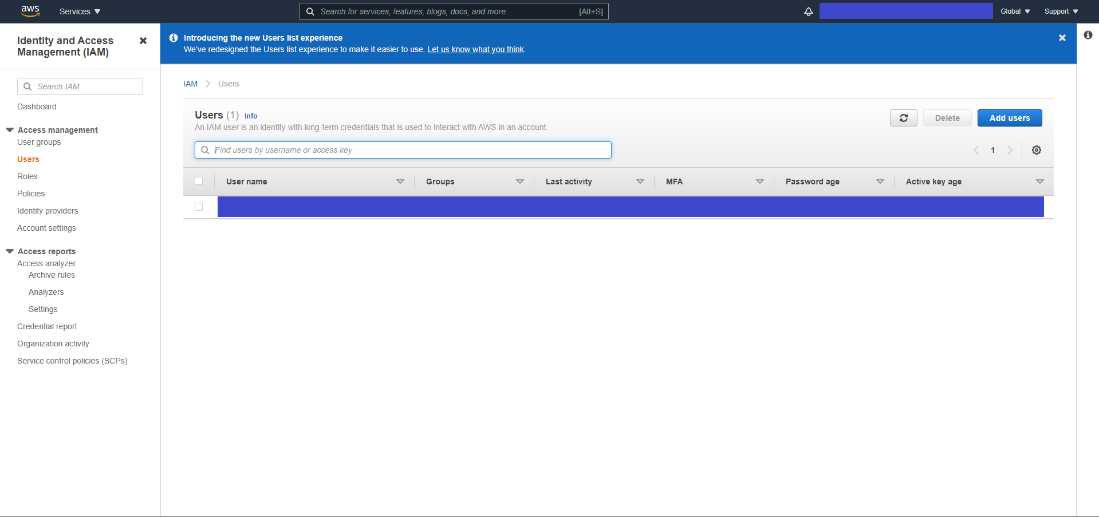
图 22:IAM 用户选项卡
-
在 IAM users (IAM 用户) 选项卡中,单击 Add User (添加用户) 以访问 AWS add user 设置。
-
在第一个选项卡上,提供用户名,然后选择要作为访问密钥的 AWS 凭证类型。
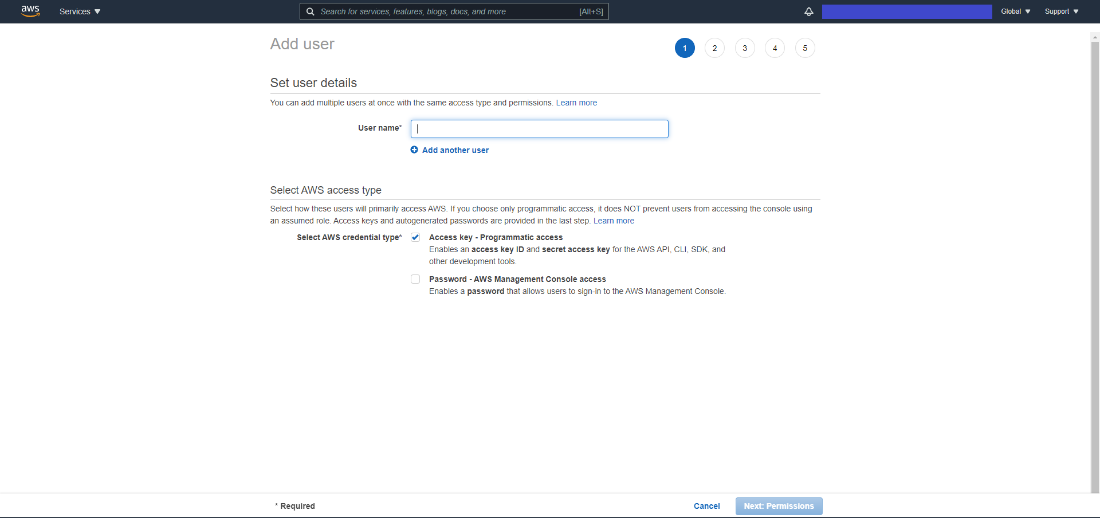
图 23:设置用户详细信息选项卡
-
在第二个选项卡上,创建一个组以为新 IAM 用户附加策略。
一个。搜索 S3 并选择 AmazonS3FullAccess 策略。
b.点击创建组。
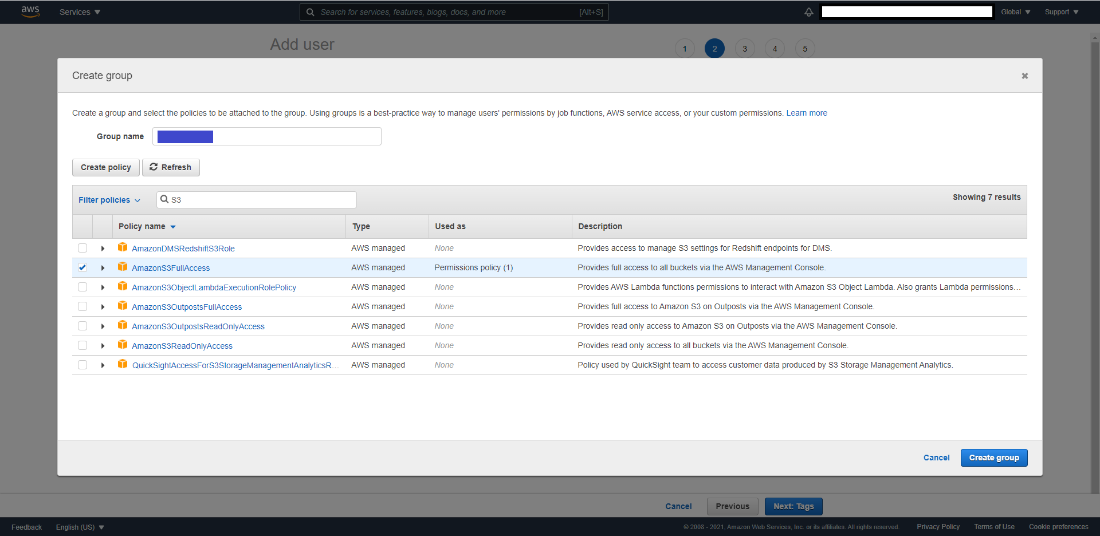
图 24:创建组选项卡
-
选择您创建的组,然后单击下一步:标签。
-
标记是可选的。如果您不想添加标签,可以通过单击“下一步:审核”继续“查看”选项卡。
-
审核后,您可以单击“创建用户”按钮。
-
在此页面上,您可以访问 AWS Key 和 AWS Secret Access key。(单击“显示”查看它们。
一个。保存它们,以便稍后在已安装的 Edge Insights for Fleet Reference Implementation 上的 Cloud Data - Configuration 中使用。
注意:AWS 私有密钥仅在此页面上可见,您无法通过任何其他方式获取密钥。
b.如果您忘记保存 AWS 私有密钥,可以删除旧密钥并创建另一个密钥。

图 25:AWS 密钥和秘密访问密钥
-
保存密钥后,关闭选项卡。您将返回到 IAM 控制面板页面。
-
单击创建的用户,然后保存要在 S3 存储桶设置中使用的用户 ARN。
注意:如果您忘记保存 User (用户) 选项卡中的 AWS 私有密钥,则可以选择 Security Credentials (安全凭证),删除访问密钥并创建另一个 Secret Key。
S3 存储桶
S3 存储桶服务提供用于基于云的应用程序的云存储。
S3 存储桶服务设置
-
打开 Amazon 管理控制台并搜索 Amazon S3。
-
单击 S3 以打开 AWS S3 Bucket 控制面板。
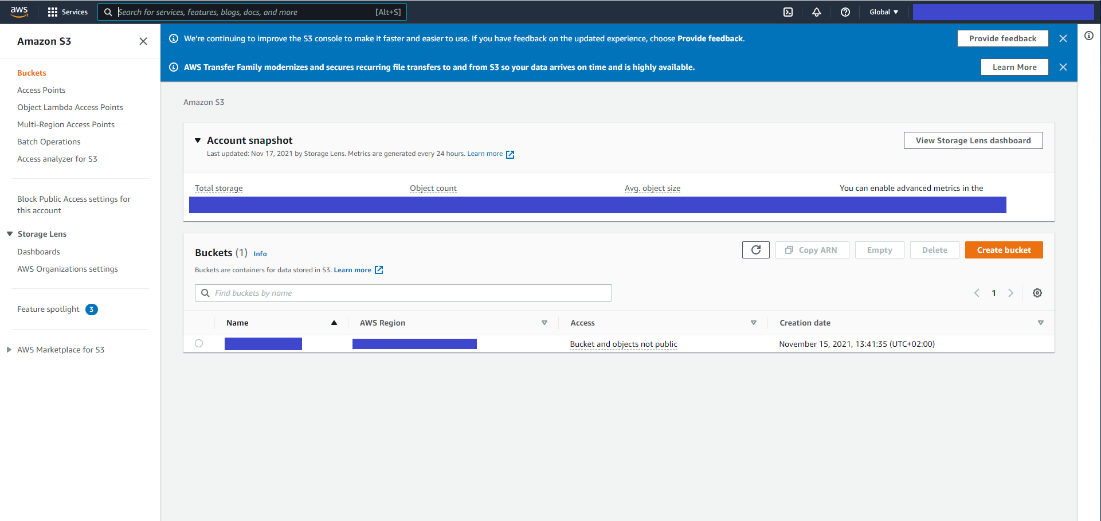
图 26:AWS S3 存储桶控制面板
-
在左侧菜单中,单击 Buckets。
-
单击 Create Bucket 按钮以打开 Create Bucket 控制面板。
-
输入存储桶的名称,然后选择您的首选区域。
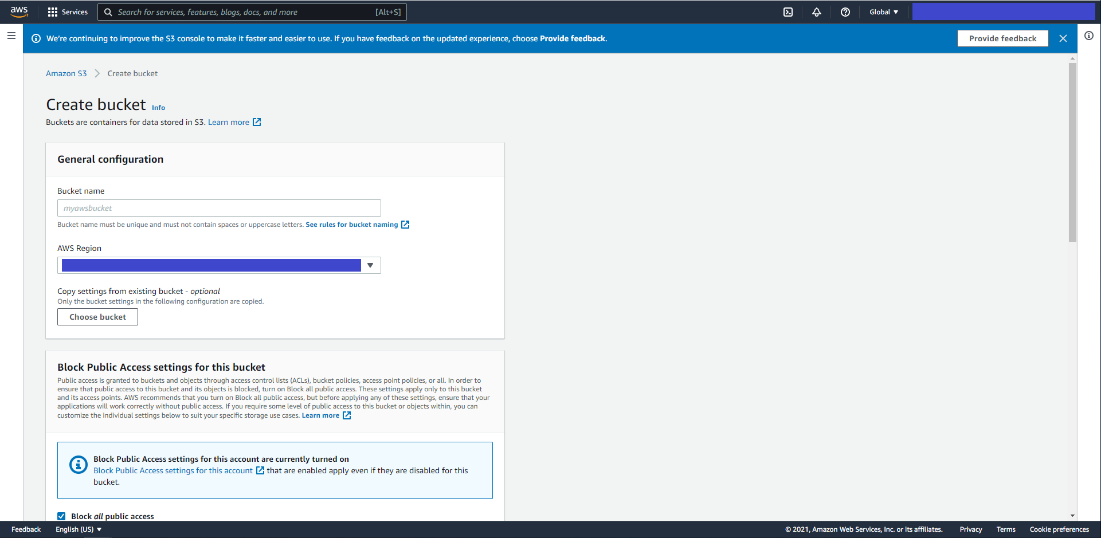
图 27:创建存储桶常规配置
-
向下滚动并单击 Create Bucket。
-
在 S3 存储桶控制面板中,单击新创建的存储桶,然后转到 Permissions (权限) 选项卡。
-
滚动到 Bucket Policy 并单击 Edit 以在已创建的语句选项卡中添加新语句以拒绝所有上传。
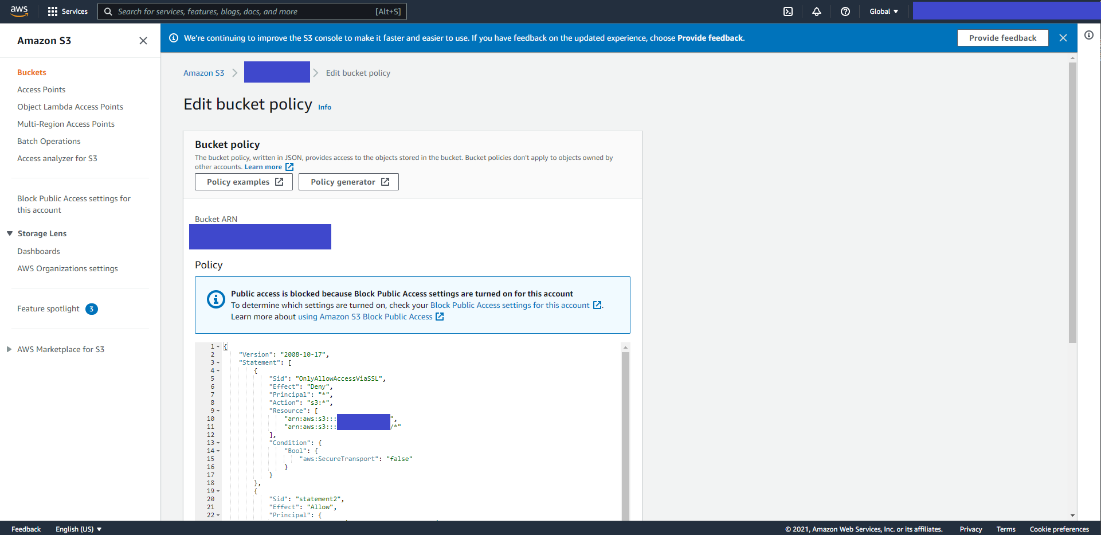
图 28:编辑存储桶策略
-
在添加以下信息之前,必须添加逗号。
一个。使用以下语句进行更新,其中包含语句名称、在 IAM 设置中保存的用户 ARN - 步骤 11 和您的存储桶名称。
b.单击“保存更改”。如果更改成功,您将看到一条成功保存的消息,否则您需要重新分析 json 文件以修复错误。
摘要和后续步骤
此应用程序成功实现了英特尔®发行版 OpenVINO™ 工具套件插件,用于检测和跟踪车辆和行人,并可用作估计交叉路口安全指标的基础。它可以进一步扩展,以提供对来自网络流(RTSP 或相机设备)的源的支持。
下一步,您可以通过将目标检测器模型以及跟踪和碰撞检测算法替换为替代算法来试验精度/吞吐量权衡。
此外,在支持 RAN 硬件的适当平台上,您可以载入第三方 5G RAN(无线接入网络)实施,从而轻松托管私有或公共 5G 小型基站。为了执行视频分析,无线IP摄像机可以通过小型蜂窝连接,并且来自摄像机的视频流量可以通过高速SmartEdge-Open数据平面路由到视觉智能容器。由于 5G RAN 和视觉智能工作负载托管在单个系统中,因此该解决方案受益于工作负载之间更快的数据传输和更低的总拥有成本。
了解更多信息
若要继续学习,请参阅以下指南和软件资源:
故障 排除
Pod 状态检查
使用以下命令验证 Pod 是否已就绪以及是否处于“正在运行”状态:
如果任何 Pod 未处于“正在运行”状态,请使用以下命令获取有关 Pod 状态的更多信息:
重新启动服务器后,ITM 仪表板未显示在浏览器上
运行以下命令:
Pod 状态长时间显示“ContainerCreating”
如果 Pod 状态显示 “ContainerCreating” 或 “Error” 或 “CrashLoopBackOff” 一段时间(5 分钟或更长时间),请运行以下命令:
子进程:32 问题
如果看到任何与子进程相关的错误,请运行以下命令:
Grafana 仪表板未显示在浏览器上
运行以下命令:
支持论坛
如果您无法解决问题,请联系支持论坛。
要将安装日志与您的问题一起附加,请执行以下命令以tar.gz压缩格式(例如 ITM.tar.gz)合并日志文件列表。

为开发者提供丰富的英特尔开发套件资源、创新技术、解决方案与行业活动。欢迎关注!
更多推荐


 0
0 0
0- 0


 已为社区贡献327条内容

所有评论(0)